Eureka!
KNOWLEDGE BASE ARTICLE
Non è più necessario accedere al Supporto per leggere gli articoli della KBA.
Finalmente semplicemente cliccando sull'oggetto della "pillola" settimanale si accede direttamente all'articolo senza passare attraverso il portale del Supporto.Quante volte mi sono arresa e non ho proseguito perchè magari non ricordavo nè avevo memorizzato le credenziali!
Anche il portale del Supporto è migliorato; è più semplice ma soprattutto è raggiungibile immediatamente!
Ty a Jeremy Linden...adesso potrò leggere tutti i suoi interessanti articoli senza farmi venire lo stress da accesso.
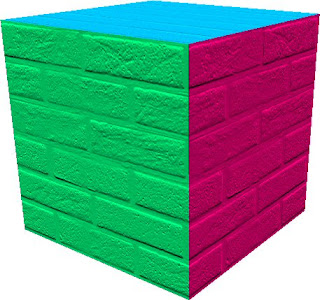
L'ultimo riguarda il BUMP MAPPING, ovvero come inserire attraverso la scheda texture alcune variazioni o funzioni che migliorano e rendono più realistico l'aspetto esterno degli oggetti.
ecco un esempio
Qui l'articolo del blog ufficiale. settimana #21
************************************************************************************
Knowledge Base
Second Life Info > Knowledge Base > Content Creation > Textures and Snapshots >
Knowledge Base
Second Life Info > Knowledge Base > Content Creation > Textures and Snapshots >
- Bump Mapping
Bump mapping is a graphical rendering technique in which a "bump map" texture is applied to the surface of a 3D object in order to give it a richer visual appearance closer to that of the real world. You can apply bump maps to some of your objects in Second Life to create a very stimulating visual experience!
To apply a bump map to an object: 
1) Right-click the object and select Edit.
2) If the tools window is not already expanded, press the More >> button.
3) Click the Texture tab.
4) In the Bumpiness dropdown menu, select a bump map from the list provided. The bump map will be applied over the existing texture on the object, giving the object's surface a more tactile look.
Trivia: The Brightness and Darkness bump maps enhance the bumpiness of the existing texture on the object; if you apply them to an object with no texture, nothing will happen! Try applying the different bump maps to a standard cube and see what happens. The faces on the cubes below have been colored to add perspective:


 Flickr/eleonoraporta
 Myspace/eleonora_porta
 Twitter/eleonoraporta
 YouTube/username
 Del.icio.us/eleonora.porta
 Wikipedia/eleonoraporta
 GMail/Eleonora Porta
 Technorati/eleonoraporta
 Blog/Eleonora Porta


Nessun commento:
Posta un commento